Importing local projects into Project Server 2013: First Scrub your Projects
Project Server 2013 offers many great ways to import projects into Project Server 2013. This post focuses on importing a Microsoft Project schedule into Project Server 2013. For more ways to import projects into Project Server 2013 – see our other blog posting, Ways to Import Projects Into Project Server 2013.
Before you make any changes you your project – we highly recommended making a back up of you local project file (just incase you change something that you did not intend to. Also we recommend saving an Interim Plan with the Project file itself.
First you need to establish a connection from Project Professional to Project Server.
Next you need to Scrub your project so your project will align with your project server standards (enterprise vs local resources, etc). These steps will save you head aches in the long run. Scrub your projects FIRST before importing them or saving them into Project Server. Once these are cleaned-up you are able to import your projects into server.
Let us know your thoughts via the comments or contact us if you have any questions.
Note: if you already created a project in Project Server using an EPT, you can replace the generic schedule created from the EPT (via the project schedule template). For more information on How To Overwrite your schedule/WBS created from a template with a local (more detailed) project schedule, click here.
1) Remove all filters from the project view your are looking to import / copy to Project Server. Often you are looking at a filtered view. The easiest way to do this is go to click on
[No Filter] in the Filter dropdown from the View tab. 
2) Insert the Project Summary Task and make sure that you do not have a duplicate entry in Line #1 (Project Name should be contained in the Project Summary task –> Row 0 not in Row 1). 
3) Resource Clean-up – this is probably the biggest area of clean-up. Depending on how many local resources you have this could be quite quick or take some time. The steps are very easy.
1) Remove all resources with zero hours
2) Consolidate all local resources
3) Replace all local resources with Enterprise Resource Names
4) Do this step ONLY if your local project is connected to a Resource Pool – then you will need to disconnect the resource pool (i.e. another project .mpp file using that project’s resources) from the local project you are importing.
To disconnect from the Resource Pool you need to go into Resource Pool –> Share Resources. See select the settings below.
You will may get prompted with this warning – and that is fine.
5) Remove all resources with zero hours (0h) work.
i) Open the Resource Usage
ii) Filter the Work column to 0 hrs
iii) Delete all Resources (that do not have any assignment). You can see this easily in the Resource Usage view. Resources with 0 hrs and no assignments should be removed. Remove the resources that have no assignments only not tasks that resources may have.
b) Consolidate all local resources into one name (preferably the exact name of the Enterprise Resource naming convention. For example, we often see project that contain several (and I mean several) resource name variations / duplications. We recently reviewed a client project schedule where my name had four resource entries:
Jacques G
Goupil; Jacques
Jacques
Jacque (spelled wrong).
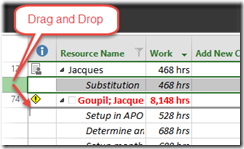
If you see multiple resource names in the Resource Usage view you with assignments you can drag all the assignments from the duplicate resource (example from ‘Jacque’ to ‘Goupil;Jacques’ to the resource name you are consolidating and then remove the duplicate/misspelled resource name.
Note: You may receive a Warning that you already have this resource on that assignment. In this case, confirm that resource assignments for this task – if you intended for only one Jacques on the assignment then simply delete the duplicate resource/resource assignment. You will want to make sure that the assignment duration/work is still what you want.
c) Replace all local resources with Enterprise Resource Names. (Only if you have not already renamed all the local resources with the exact Enterprise Resource Name in step b above)
Option #1: You can go into the Resource Sheet and rename all resources to the corresponding Enterprise Resource.
Option #2: You can leverage the Build Team option and replace all local resources with enterprise resources.
Replace all Local Resources with Enterprise Resources
1) Select the Enterprise Resource from the list on the left-side
2) Select the Local Resource on the list on the right-side
3) Then click the Replace button.
4) Repeat for all your local resources until you have replaced all local resources with enterprise resources.
5) Then click OK
PPM Works is a full service Microsoft Project and Portfolio Management consultancy, focused on Microsoft Project Server and Microsoft SharePoint platforms. We believe in partnering with our clients to exceed expectations and build long lasting rewarding partnerships. We are continuously building a knowledge base of multiple tips, tricks and solutions to make your use of Microsoft Project Pro as quick and easy as possible. Contact us for more information.
Stay updated with the latest of Project Online/Server 2013 with us: Subscribe. Check our future events!
Subscribe to our webcast email list for updates on our upcoming webinars!
Visit our FAQ Page for access to our tool box.


![clip_image004[4] resource usage view](https://ppmworks.com/wp-content/uploads/2015/01/clip_image0044_thumb.jpg)


![clip_image006[4] enterprise resources](https://ppmworks.com/wp-content/uploads/2015/01/clip_image0064_thumb.jpg)


