- All
- Microsoft Products
- Misc
- PPM Works Solutions
- Project
- Project Server
- Project to Planner Sync
- SharePoint
- SQL Server
Both Project Plan 3 and Project Plan 5 include:
Project for the web
Project Online
Project Online desktop client
The Project Plan 5 system requirements align with the ones for Microsoft 365 while Project Server 2019 aligns with the SharePoint Server system requirements.
Project Plan 5 is our online project portfolio management product while Project Server 2019 is our on-premise ppm product.
- Project Professional has a perpetual license. Once activated, the software will not expire.
- Use of the Project Online desktop client requires an active Project Plan 3 or Project Plan 5 subscription.
- The core features of the two products are identical with one exception, Project Online desktop client includes Kanban boards.
Can I open my Project Professional 2007 files in Project Professional 2019?
Project plans from earlier versions of Project can be used in Project 2019 by providing users all the benefits of the current product. To avoid compatibility issues when sharing your new Project files with Project 2007 users, save your project as a Project 2007 file format. (Note: Project 2019, 2016, 2013, and 2010 share the same file format.)
You can install Project Online desktop client on up to 5 PCs.
Project has the same browser support as M365. Here are the recommendations:
- Safari and Chrome: works with current version.
- Microsoft Edge: works with current version, may work with older versions but suggested to upgrade.
- Internet Explorer: works with Internet Explorer 11 or the newest version. May work with an older version, but suggested to upgrade.
- If your organization is dependent upon earlier versions of Internet Explorer to access older web apps and services, you should consider upgrading to Internet Explorer 11 and evaluating Enterprise Mode for Internet Explorer 11 or IE mode for the new Microsoft Edge, which provides backward compatibility for legacy web apps.
- Firefox: works with current version. However, Firefox does not fully support Microsoft Teams meetings.
- Microsoft Teams meetings are fully supported on the latest versions of Microsoft Edge and Google Chrome.
Windows 10 or later is required to install Project Professional 2019 and Project Standard 2019.
Project Plan 1 and Project Online Essentials are different subscriptions:
Project Plan 1
- Technology: Project for the web and Microsoft Power Platform
- Who it’s for: Anyone who manages projects as a part of their job
- How the subscription works: A Project Plan 1 subscription is independent from a Project Plan 3 or Project Plan 5 subscription. Plan 1 only works with projects created in the Project for the web service, which is a part of the Project Plan 1, Project Plan 3, and Project Plan 5 subscriptions.
- Description: Project Plan 1 offers core, web-based capabilities such as scheduling, creating project teams, assigning tasks, and displaying multiple views like grid (list), board, and timeline (Gantt).
Project Online Essentials
- Technology: Project Online and SharePoint
- Who it’s for: Team members
- How the subscription works: Project Online Essentials only connects to the Project Online service accompanying either a Project Plan 3 or Project Plan 5 subscription within the tenant.
- Description: Project Online Essentials features a web-based interface that allows users to submit timesheets and update tasks, issues, and risks only in projects created within Project Online.
Yes, Project Online Essentials is available for purchase either through your Volume Licensing agreement or your Microsoft 365 admin center.
Project Server 2019 cannot coexist with previous versions of Project Server. More information about upgrade and migration planning for Project Server is available by visiting the Project Server documentation site.
Project for the web comes with Project Plan 1, Project Plan 3, and Project Plan 5.
Project Online is built on Microsoft SharePoint while Project for the web is built on the Microsoft Power Platform.
Project for the web is the most recent offering for cloud-based project management. It enables you to work in a grid (list), board, or timeline (Gantt) view. Designed to be easy to start and simple to use, you and your team can manage and collaborate on the same project at the same time.
Yes, however these guest users will not be included in the Enterprise Resource Pool and they will not see any of the resources assigned to the tasks.
No, Project can not determine which update would apply
Yes, you can decide which plans task should be synchronized to. One Project can have tasks linked to multiple different plans.
Yes, the sync tracks deleted tasks and automatically updates the task that have been deleted in the Sync Status field.
Yes. This is very popular request from those currently managing a project in Planner and need to see the visibility and status in Microsoft Project
No, there is not a limit to the number of tasks from Project, however Planner used to have a limit (which was removed in 2010) and may come back.
The sync will work if you are using Project Professional and save/store your projects in Project Online.
By default, the following fields can be changed on either end:
- Task Title
- Task Start
- Task End (Due Date)
- Task % Complete (Progress)
- Task Description (Notes)
- Task Bucket Name
- Task Priority
- Task Labels
- Task Assignments
Yes, Planner does not have security controls to prevent this.
The sync solution will not delete tasks on either end.
If a Planner Task is deleted the task-level sync field in Project indicates “Deleted”
If a Project Task is deleted the planner task title is appending with “|Deleted”
There are separate configuration options to prevent Planner Task updates from updating:
- Project Task Title
- Project Task Start and Finish
- Project Task % Complete
- Project Task Assignments
During install a “Planner Sync to Multiple PlanId” custom task-level field is created. To sync a Project to multiple plans, you must copy the PlanId (described above) and paste into this task-level custom field.
During install a “Planner Sync Task Bucket” custom task-level field is created. This is a free form text field so it can support unlimited Bucket names. It’s possible to change this field to a drop-down list (lookup field). However, Project Online lookup fields are the same for all projects so you would need to have the same buckets across all projects.
The default sync time is every 10 minutes.
Please reach out to discuss pricing
Yes, the Dates, Assigned to, Task Title, as well as the Progress, Priority, Planner Buckets, Label and Comments have a bi-directional sync to/from Project and Planner.
Yes, the dependencies (both predecessors and successors) that are set in Project and go to Planner will remain in Project when the data syncs back from Planner to Project. When possible the task will remain automatically scheduled. However there are some conditions, such as setting a start/finish date on a weekend/non-working date that require manually scheduled tasks.
No, at this time checklist items are not synced.
The task will sync but the assignment will be blank – there will not be a resource assigned.
The tool will wait for the project to be checked in and apply the updates.
The tasks will be synched, duplicate tasks are not created, no risk to starting the service.
No, Project Server 2019 does not include SharePoint Server 2019. However, you need to install SharePoint 2019 before you install Project Server 2019. Find out more information on hardware and software requirements for Project Server by visiting the Project Server documentation site.
Internet Explorer 10, Internet Explorer 9, Internet Explorer 8, FireFox 10, Safari 5, Google Chrome 17.
The following are helpful Project Server Collaboration definitions:
- Risks Risk management involves proactively identifying and tracking events and conditions that can potentially affect future planning for a project. Risks can be rated by severity and assigned an estimate for how likely they are to occur.
- Issues Issues can be used to track work items that are not easily identified as assignments or tasks in projects. Project managers, resource managers, and team leads can then determine whether the issues will affect the project and identify strategies to manage the issues before they become larger problems.
- Documents A document library provides a location for team members to collaborate and share documents and other project artifacts with project team members.
- Project Site A project site can exist for each project saved to the Project Server database. The project site enables additional collaboration features (for example, announcements, alerts, deliverables and the ability to link these to your project tasks) by providing a Web site for each project that makes the capabilities of SharePoint Foundation available to a project team.
For more information review the Microsoft TechNet article: https://technet.microsoft.com/en-us/library/hh767484(v=office.14).aspx
How do you measure the completeness of your project? If it depends on whether a physical item is completed (rather than elapsed time or an amount of work performed), you might want to set the Default task Earned Value method option to Physical % complete.
Note Other values are calculated from earned value, so your decision affects the entire earned value analysis.
Change the default % complete setting
This procedure affects all new tasks you add after you change the setting.
- Click File > Options > Advanced.
- Scroll down to Earned Value options for this project.
- Choose an option from the Default task Earned Value method list.
- % complete can be calculated by Project or entered directly by you, depending on how you track actual work. This is the default setting for new projects.
- Physical % complete is always entered directly by you.
Change % complete setting for specific tasks
Use this procedure to change the earned value method for specific existing tasks:
- Select the tasks you want to change.
- Right-click the task, click Information, then click the Advanced tab.
- In the Earned value method box, click the calculation method that you want.
Tip If your project has some tasks that use one type of earned value method and others that use the other type, we recommend adding the Earned Value Method column to the view. This makes it easier to see at a glance which method is being used for each task, and it’s also easier to change the setting for each task if needed. In the column header row, right click where you want to insert the column, then click Insert Column > Earned Value Method.
More about % complete
Here’s a simple example of how the % complete values may differ, based on the earned value method you use. Say you’re building a stone wall that consists of 100 stones stacked in 5 rows. You lay the first row of 20 stones in 20 minutes. However, the second row takes you 25 minutes because you have to lift the stones up one row higher. The third row takes you 30 minutes, the fourth 35 minutes, and the last row takes 40 minutes, for a total of 150 minutes for the project.
After completing the third row, you could say that the wall was 60 percent physically complete, because you had laid 60 of 100 stones. However, in terms of duration, the project was only 50 percent complete because you had only spent 75 of the required 150 minutes.
Depending on how you get paid for the work—how the value is earned (by the stone or by the hour)—you may choose the percent complete value or the physical percent complete value to properly reflect this in the earned value analysis.
For more detailed information about earned value analysis, see Earned value analysis, for the rest of us.
Usually, you report your project’s progress on a day you set— the status date, to use project management-speak. For example, if you want sales report figures for last month, you set the status date to the last day of that month. Or, if progress reports are due Friday, but were sent in late, you might set the status date back to Friday before reporting on progress information.
The status date is almost never the current date, so you need to set it:
- Click Project > Status Date.

- Select the new status date.
To set the status date back to the current date, either enter the current date, or enter NA in the date field.

View the status date on the Gantt Chart
- On the Gantt Chart, click Format > Gridlines.
- Under Line to change, pick Status Date, and then select a line style and color.

When your boss asks how your project is doing compared to your original plan, the last thing you want to say is “I don’t know.” You can avoid that fate by setting and saving a baseline as a snapshot of your original schedule before your project gets rolling.
- Click Project > Set Baseline > Set Baseline.
- Pick the baseline you want to set.

Tip You can set as many as 11 baselines in a single project. Do this to get frequent snapshots of where things stand.
- Click Entire Project.
You don’t need to take any special steps to save the baseline. When you save your project, the baseline is saved with it.
Project management tip If your current data never seems to sync with your baselines, you may need to take a hard look at your original plan. The project scope may have changed, for example, or you may need more resources than you first thought. Check with your project stakeholders, and consider setting a new baseline using the above procedure.
Update a baseline
If you add a task to your project after a baseline has been set, you can add the new task to this baseline.
- Select the new task you want to add to the baseline.
If the task has subtasks, be sure to select them, too. - Click Project > Set baseline > Set Baseline, and then pick the baseline you want to update.
- In the Set Baseline dialog box, pick the baseline you want to update.
- Under For, click Selected tasks.
- If you’re adding subtasks, under Roll up baselines, click one of the following to specify how you want subtasks to be added up their summary tasks.
- To all summary tasks Updated baseline data for the new tasks is rolled up to all associated summary tasks, not just the nearest summary task.
- From subtasks into selected summary task(s) Baseline data is updated only for the selected summary task. Typically, you’ll do this so that only the nearest summary task reflects the new roll-up data.
Check out our blog Project Server 2013 Requirements Scroll down to the Software Requirements.
See a list of all supported browser versions here: Project Server Online and Project Server 2013 Browser Requirements.
Microsoft has documented all necessary requirements for Project Server 2013 and you can find all the information posted on our blog Project Server 2013 Requirements
No, Project Server 2013 does not include SharePoint Server 2013. However, you need to install SharePoint 2013 prior to installing Project Server 2013. More information about hardware and software requirements is available on TechNet.
Project Server 2013 cannot co-exist with previous versions of Project Server. More information about upgrade and migration planning are available on TechNet.
Have you created a project site and made changes to the project site template – and want those changes on your project? If you have not loaded any data onto the project site then you can Delete and Recreate the project site using the new template. See below.
Step 1: Delete Project Site.
- Log on to PWA
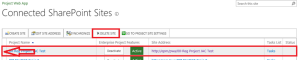
- Click on Server Settings >> Connected SharePoint Sites.
- On the Connected SharePoint Sites page, from the Project Name list, select a project for which you want to delete a project site and then Click on Delete Site. You need to click on the first column to highlight the entire row.
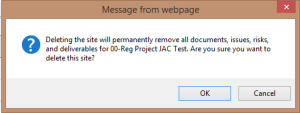
- Click on OK for the below warning message.
- The selected Project Site and its content will be deleted permanently
Step 2: Recreate Project Site.
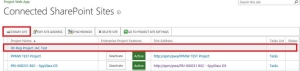
- On the Connected SharePoint Sites page, from the Project Name list, select a project for which you want to re-create a project site and click on Create Site.
-
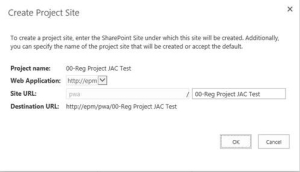
- Accept the default setting you will get on below “Create Project Site” window and click on OK. Your new project site will be created using updated template.
Project Online is our new online project and portfolio management (PPM) service delivered through Office 365 and Project Server 2013 is our on -premise project and portfolio management (PPM) product.
The core features of the two products are identical. Project Professional has a perpetual license—once activated, the software will not expire. Project Pro for Office 365 requires an active Office 365 subscription
Project plans from earlier versions of Project can be used in the new Project providing users all the benefits of new product or service. To avoid compatibility issues when sharing your new Project files with Project 2007 users, save your project as a Project 2007 file format.(note – Project 2013 and 2010 share the same file format)
You can install Project Pro for Office 365 on up to 5 PCs.
The new Project SKUs are designed to run side-by-side with existing Project applications without the need to uninstall previous versions.
Internet Explorer 8 or higher, and latest version in-market of Firefox, Chrome and Safari.
Windows 7 or later is required to install Project Professional 2013.
This is a common question for those looking to implement Microsoft Project Server. Our team has provided all the specifics in our blog posting including a link to the complete Microsoft TechNet article. You can find all the information.
Question: Unable to open project from Project Online/PWA by clicking the project icon in the Indicator column on Project Center. When the user clicks on the icon, it doesn’t open Project Professional like it should. The user is on the latest IE and clear their internet cache and they have the correct permissions in Project to Open projects.
You may have two versions of project installed (1. click to run and 2. the version pushed by IT). Check if user has two versions of Project installed using these steps:
- Open Control Panel.
- Click “Uninstall a Program”.
- Check if you see two versions of Project
Check the Project version number using these steps:
- Start Microsoft Project
- Click the File tab in the ribbon
- Click Account
- On the right, you should see an About Project button.
- Click on the About Project Button
Additional Note: This issue will also occur anytime alternative versions of Office are installed or patched after Project. The typical solution in this cases is to repair Project, which unfortunately can be an ongoing issue.
PPM Works will install the code, PWA Project Views, and Project Detail Pages to support the Sync
For team members: Microsoft Planner (E1 or E2, etc.)
For project managers: Microsoft Project Online with a Project Plan 3 license:
The Sync Service account will need both Office 365 (with Planner) and a Microsoft Project Plan 3 license
An Azure AD Account with Group Admin role will be used by the Sync Service to access Project Online and Microsoft Planner
Yes. You will can add the existing Plan UID into the project to sync to an existing plan.
Similar to selecting which projects to sync, every task has a sync option which you can turn on or off.
Yes, the sync will allow changes from both Project and Planner to sync back and forth.
To get the integration capability, you need to subscribe to either Project Online Professional or Project Online Premium. For Planner, you need to subscribe to Office 365 Business Essentials, Business Premium, E1-E5, or an Education plan. Contact us with any questions.
Agile in Project is available for Project Online Professional and Project Online Premium subscriptions. The feature works with Project standalone .mpp files and with Project Online. It does not work with Project Server 2016—if you open Project connected to Project Server 2016, the agile in Project feature won’t show up. If you open an .mpp file with agile data in a previous version of Project, you won’t see the agile fields, but the agile data won’t be lost. Contact us with any questions.
Why PPM Works?
We are a Microsoft Gold Partner offering full service Microsoft Work Management consulting, focused on Microsoft 365, Project, Teams, Power Platform, and SharePoint. We believe in teaming with our clients to exceed expectations and build long-lasting rewarding partnerships. Our team’s experience runs deep with Microsoft. We have performed over 375 Project implementations and integrations, trained thousands of students, and developed several business applications. We contributed to the new release of Microsoft Project for the past three cycles, share our expertise as volunteers for PMI and other industry groups, and developed Microsoft certification exams and certifications series. In addition to our Microsoft Gold Partner recognition we sit on two boards for the Microsoft Project Users Group.
Read more about us here
As long as the person is a Project Server or Project Online user then you can simply add the user to the project and publish to allow project/project site visibility.
To add the user to the schedule, please follow the following steps:
- Click the Project Name from PWA
- Click the schedule in the left Navigation pane
- Click Project and select Edit and click Build Team
- Select the Resource and Click Add.
- Click Save & Close.
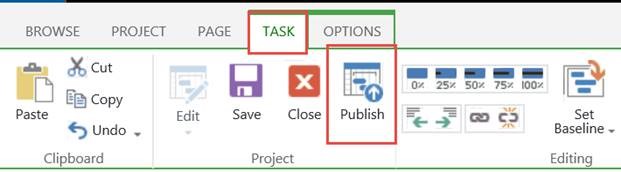
- Click Task and select publish
- Click Close and select the Check-In

If you are using Chrome as your web browser you will see the following message when trying to export a list from SharePoint to Excel.
To export a list you must have a Microsoft SharePoint Foundation compatible application.
By default Chrome doesn’t support ActiveX controls. An ActiveX control called SpreadSheetLauncher is used in SharePoint 2013 to validate if you have Excel installed. Use IE to export SharePoint lists in to Excel.
If you are seeing the following error message when sorting, grouping or filtering views in Project Center: “The system could not perform the intended actions. Refresh the page and try again. If the problem persists contact your administrator” You will need to changed your security settings in your browser.
- Click on the cog wheel to the right of your browser and select internet options | Security.
- Change the security level from custom to Default level and click OK.
- You will need to close and reopen the browser to apply your settings.
When opening the project in Project Pro, a yellow banner will appear if the engagement was edited by the Resource Manager. Select View Engagements to view the edits in the Resource Plan view.
![]()
If the request is approved the Project Manager will see the Engagement Status Field in Project Pro changed from Proposed to Committed.
If the engagement is rejected the Project Manager will see Rejected in the status field.
Click Refresh on the ribbon to see updates to requests. The project does not need to be checked in to see updates.
Comments from the Resource Manager are visible in the indicator column next to the Resource Name.
To view engagement requests:
- Select the resources you manage in Resource Center
- Select the Resource Requests command on the ribbon

Note: The resource requests in this view are only those requests for the resources selected in Resource Center, not all requests. To add resources to this view, navigate back to Resource Center and select the additional resources.
From the Resource Requests view, select the checkbox next to the Resource Name
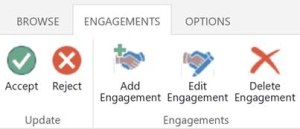
- Accept, Reject, Edit, or Delete the engagement
- Use the drop down next to the Resource Name to swap one resource for another
Note: The resources available to replace the requested resource are those previously selected from Resource Center.
The Project Manager will see the updates in the Resource Plan view in Project Pro along with comments you may have added when accepting or rejecting the request.
From Resource Center:
- Select the resources you would like to view in the Heatmap
- Select Capacity Planning on the ribbon
- Change the view drop down to the Capacity and Engagements Heatmap
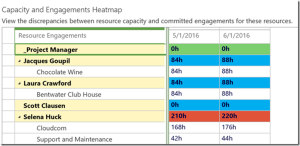
The view displays the discrepancy between committed engagements and capacity.
Red = Overallocated
Blue = Underallocated
Green = Resources engaged time is equal to their capacity
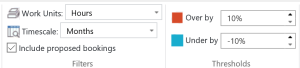
Use the ribbon to:
- Change the filter to include proposed bookings to view engagements that have not been approved
- Change the threshold for over and underallocated resources
Both Resource Managers and Project Managers can use the Capacity and Engagements Heatmap to agree on which resources are the best choice for the project.
Task Inspector links not working in Project Server
If you receive an error when clicking on the Task Inspector hyperlinks then check your Internet Explorer Settings and make sure that you either set the Internet sites security level to ‘Medium-high’.
This supports the notion that the “task Inspector” pane uses Jscript which does not run if IE Security is set to high or in some cases medium. On a side note, in previous version you did need to adjust the IE settings even to get the PWA homepage to render.
Let us know if you have any questions.
Is the Sync to Outlook button greyed out for you on the ribbon of the tasks list?
SharePoint and Project Online has a built in Outlook Sync feature available. In order to sync your tasks, your Outlook mailbox needs to be hosted on an Exchange 2013 server deployed in the same topology. If you are using Project Online (which is an Office 365 offering), then you need to make sure to use Exchange on Office 365 as well to take advantage of this new feature.